In our previous article, we discussed Single App Kiosk mode in Windows 10/11. Expanding on that, Windows Kiosk mode allows organizations to lock down devices for specific tasks like digital signage, POS systems, or public terminals, enhancing security and user focus.
In this new article, we’ll go through the Windows 10/11 Multi-App Kiosk experience and how to control it from Intune. Microsoft Intune simplifies kiosk management by enabling IT admins to remotely configure single-app or multi-app kiosk modes, enforce security policies, and monitor compliance. This centralized approach reduces maintenance efforts and improves efficiency, making it easier to deploy and manage kiosk devices at scale.
Table of Contents
Intune Native KIOSK Profile
Microsoft native KIOSK Profile can be used for Single App Kiosk (Windows 10/11) and Multi-App KIOSK (Windows 10 only). Based on Microsoft statement, Windows 11 Multi-App Kiosk can’t be administered through Native Profile in Intune.

Common-Method for Windows 10/11
Windows Assigned Access is the Microsoft’s recommended approach for managing Windows 11 Multi-App Kiosk through Microsoft Intune. To ensure a unified configuration, this article will explore setting up a Windows 10/11 Multi-App Kiosk using a Custom Policy via the Assigned Access feature.
OMA-URI
To Control Kiosk Via assigned access, best and easiest user-friendly way is to create Custom Configuration Profile (OMA-URI) with assigned access desired restrictions.
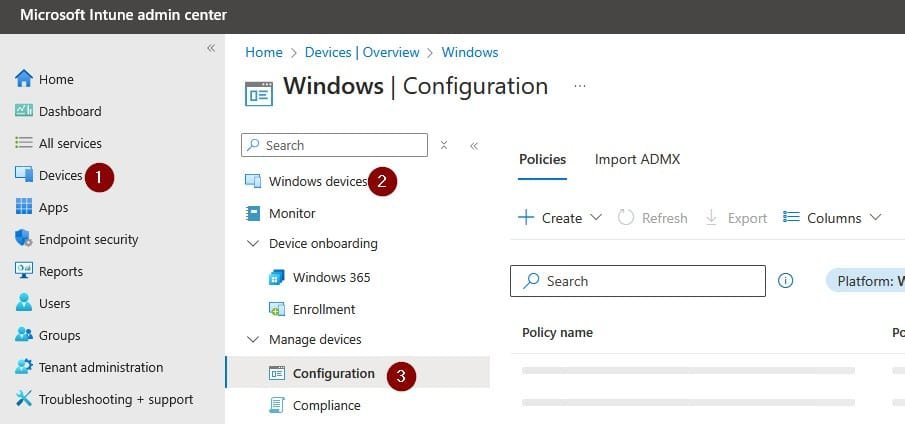
1- Via Microsoft Intune Portal access Devices > Windows > Configurations
2- Click on Create > New Policy. Select Platform Windows 10 and Later, Profile type Templates and Template name should be Custom
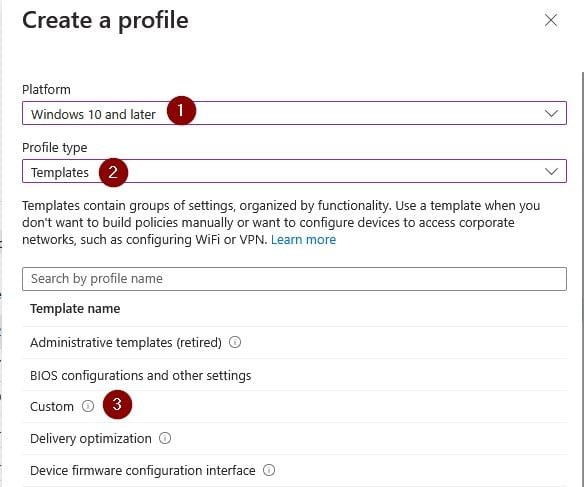
3- Give the Profile name and Note that We’ll have a separate profile for Windows 10 than Windows 11
4- Click on Add and fill-in below fields
OMA-URI used should be “./Vendor/MSFT/AssignedAccess/Configuration” and Data Type either String or String (XML)

XML Structure (Example)
Here’s an example of a possible XML configuration for Windows 10 and Windows 11, along with a detailed explanation of each section.
Windows 10
<?xml version="1.0" encoding="utf-8"?>
<AssignedAccessConfiguration xmlns:xs="http://www.w3.org/2001/XMLSchema" xmlns="http://schemas.microsoft.com/AssignedAccess/2017/config" xmlns:default="http://schemas.microsoft.com/AssignedAccess/2017/config" xmlns:rs5="http://schemas.microsoft.com/AssignedAccess/201810/config" xmlns:v3="http://schemas.microsoft.com/AssignedAccess/2020/config">
  <Profiles>
    <Profile Id="{9A2A490F-10F6-4764-974A-43B19E722C23}">
      <AllAppsList>
        <AllowedApps>
          <App AppUserModelId="Microsoft.WindowsCalculator_8wekyb3d8bbwe!App" />
          <App AppUserModelId="Microsoft.Windows.Photos_8wekyb3d8bbwe!App" />
          <App AppUserModelId="Microsoft.BingWeather_8wekyb3d8bbwe!App" />
          <App DesktopAppPath="C:\Windows\system32\cmd.exe" />
          <App DesktopAppPath="%windir%\System32\WindowsPowerShell\v1.0\Powershell.exe" />
          <App DesktopAppPath="%windir%\explorer.exe" />
          <App AppUserModelId="windows.immersivecontrolpanel_cw5n1h2txyewy!microsoft.windows.immersivecontrolpanel" />
          <App DesktopAppPath="%ProgramFiles(x86)%\Microsoft\Edge\Application\msedge.exe" />
        </AllowedApps>
      </AllAppsList>
      <rs5:FileExplorerNamespaceRestrictions>
        <rs5:AllowedNamespace Name="Downloads" />
        <v3:AllowRemovableDrives />
      </rs5:FileExplorerNamespaceRestrictions>
      <StartLayout><![CDATA[
                    <LayoutModificationTemplate xmlns:defaultlayout="http://schemas.microsoft.com/Start/2014/FullDefaultLayout" xmlns:start="http://schemas.microsoft.com/Start/2014/StartLayout" Version="1" xmlns="http://schemas.microsoft.com/Start/2014/LayoutModification">
                        <LayoutOptions StartTileGroupCellWidth="6" />
                        <DefaultLayoutOverride>
                        <StartLayoutCollection>
                            <defaultlayout:StartLayout GroupCellWidth="6">
                            <start:Group Name="">
                                <start:Tile Size="2x2" Column="0" Row="4" AppUserModelID="windows.immersivecontrolpanel_cw5n1h2txyewy!microsoft.windows.immersivecontrolpanel" />
                                <start:DesktopApplicationTile Size="2x2" Column="2" Row="4" DesktopApplicationLinkPath="%ALLUSERSPROFILE%\Microsoft\Windows\Start Menu\Programs\Microsoft Edge.lnk" />
                                <start:Tile Size="2x2" Column="4" Row="0" AppUserModelID="Microsoft.BingWeather_8wekyb3d8bbwe!App" />
                                <start:DesktopApplicationTile Size="2x2" Column="4" Row="2" DesktopApplicationLinkPath="%APPDATA%\Microsoft\Windows\Start Menu\Programs\System Tools\File Explorer.lnk" />
                                <start:DesktopApplicationTile Size="2x2" Column="2" Row="2" DesktopApplicationLinkPath="%APPDATA%\Microsoft\Windows\Start Menu\Programs\Windows PowerShell\Windows PowerShell.lnk" />
                                <start:Tile Size="2x2" Column="2" Row="0" AppUserModelID="Microsoft.Windows.Photos_8wekyb3d8bbwe!App" />
                                <start:Tile Size="2x2" Column="0" Row="0" AppUserModelID="Microsoft.WindowsCalculator_8wekyb3d8bbwe!App" />
                                <start:DesktopApplicationTile Size="2x2" Column="0" Row="2" DesktopApplicationLinkPath="%APPDATA%\Microsoft\Windows\Start Menu\Programs\System Tools\Command Prompt.lnk" />
                            </start:Group>
                            </defaultlayout:StartLayout>
                        </StartLayoutCollection>
                        </DefaultLayoutOverride>
                    </LayoutModificationTemplate>
                ]]></StartLayout>
      <Taskbar ShowTaskbar="true" />
    </Profile>
  </Profiles>
  <Configs>
    <Config>
      <AutoLogonAccount rs5:DisplayName="MS Learn Example" />
      <DefaultProfile Id="{9A2A490F-10F6-4764-974A-43B19E722C23}" />
    </Config>
  </Configs>
</AssignedAccessConfiguration>
Windows 11
<?xml version="1.0" encoding="utf-8"?>
<AssignedAccessConfiguration xmlns:xs="http://www.w3.org/2001/XMLSchema" xmlns="http://schemas.microsoft.com/AssignedAccess/2017/config" xmlns:default="http://schemas.microsoft.com/AssignedAccess/2017/config" xmlns:rs5="http://schemas.microsoft.com/AssignedAccess/201810/config" xmlns:v3="http://schemas.microsoft.com/AssignedAccess/2020/config" xmlns:v5="http://schemas.microsoft.com/AssignedAccess/2022/config">
  <Profiles>
    <Profile Id="{9A2A490F-10F6-4764-974A-43B19E722C23}">
      <AllAppsList>
        <AllowedApps>
          <App AppUserModelId="Microsoft.WindowsCalculator_8wekyb3d8bbwe!App" />
          <App AppUserModelId="Microsoft.Windows.Photos_8wekyb3d8bbwe!App" />
          <App AppUserModelId="Microsoft.BingWeather_8wekyb3d8bbwe!App" />
          <App DesktopAppPath="C:\Windows\system32\cmd.exe" />
          <App DesktopAppPath="%windir%\System32\WindowsPowerShell\v1.0\Powershell.exe" />
          <App DesktopAppPath="%windir%\explorer.exe" />
          <App AppUserModelId="windows.immersivecontrolpanel_cw5n1h2txyewy!microsoft.windows.immersivecontrolpanel" />
          <App DesktopAppPath="%ProgramFiles(x86)%\Microsoft\Edge\Application\msedge.exe" />
        </AllowedApps>
      </AllAppsList>
      <rs5:FileExplorerNamespaceRestrictions>
        <rs5:AllowedNamespace Name="Downloads" />
        <v3:AllowRemovableDrives />
      </rs5:FileExplorerNamespaceRestrictions>
      <v5:StartPins><![CDATA[{
                    "pinnedList":[
                        {"packagedAppId":"Microsoft.WindowsCalculator_8wekyb3d8bbwe!App"},
                        {"packagedAppId":"Microsoft.Windows.Photos_8wekyb3d8bbwe!App"},
                        {"packagedAppId":"Microsoft.BingWeather_8wekyb3d8bbwe!App"},
                        {"desktopAppLink":"%APPDATA%\\Microsoft\\Windows\\Start Menu\\Programs\\System Tools\\Command Prompt.lnk"},
                        {"desktopAppLink":"%APPDATA%\\Microsoft\\Windows\\Start Menu\\Programs\\Windows PowerShell\\Windows PowerShell.lnk"},
                        {"desktopAppLink":"%APPDATA%\\Microsoft\\Windows\\Start Menu\\Programs\\File Explorer.lnk"},
                        {"packagedAppId": "windows.immersivecontrolpanel_cw5n1h2txyewy!microsoft.windows.immersivecontrolpanel"},
                        {"desktopAppLink": "%ALLUSERSPROFILE%\\Microsoft\\Windows\\Start Menu\\Programs\\Microsoft Edge.lnk"}
                    ]
                }]]></v5:StartPins>
      <Taskbar ShowTaskbar="true" />
    </Profile>
  </Profiles>
  <Configs>
    <Config>
      <AutoLogonAccount rs5:DisplayName="MS Learn Example" />
      <DefaultProfile Id="{9A2A490F-10F6-4764-974A-43B19E722C23}" />
    </Config>
  </Configs>
</AssignedAccessConfiguration>
Schema Files
Schema files for Windows 10 and 11 are required to validate XML from Intune and define allowed features per configuration.

Profile ID
- Profile ID MUST be unique per XML file
- Profile ID will be attached to Kiosk Configuration (Allowed Apps, Start Layout.. etc.)
- XML can have Multiple Profile IDs, each followed by (Allowed Apps, Start Layout.. etc.)
Allowed Apps
This section will define all Applications allowed for Kiosk User to use, below is example for ~ all Application types you might need
        <AllowedApps>
          <App AppUserModelId="Microsoft.WindowsCalculator_8wekyb3d8bbwe!App" />
          <App AppUserModelId="Microsoft.Windows.Photos_8wekyb3d8bbwe!App" />
          <App AppUserModelId="Microsoft.BingWeather_8wekyb3d8bbwe!App" />
          <App DesktopAppPath="C:\Windows\system32\cmd.exe" />
          <App DesktopAppPath="%windir%\System32\WindowsPowerShell\v1.0\Powershell.exe" />
          <App DesktopAppPath="%windir%\explorer.exe" />
          <App AppUserModelId="windows.immersivecontrolpanel_cw5n1h2txyewy!microsoft.windows.immersivecontrolpanel" />
          <App DesktopAppPath="%ProgramFiles(x86)%\Microsoft\Edge\Application\msedge.exe" />
</AllowedApps>- AppUserModelId: represents App AUMID for Microsoft Store Applications (Microsoft and non-Microsoft Applications)
- Microsoft have a great article explains how to get App AUMID on Windows 10 and 11
- DesktopAppPath: represents the path for executable path for Application (Microsoft and non-Microsoft Applications)
Namespace Restrictions
Namespace Restrictions is used to control Windows Explorer allowed folders
      <rs5:FileExplorerNamespaceRestrictions>
        <rs5:AllowedNamespace Name="Downloads" />
        <v3:AllowRemovableDrives />
      </rs5:FileExplorerNamespaceRestrictions>
Allowed Namespace can be:
- Desktop
- Documents
- Pictures
- Music
- Videos
- Downloads
- Custom Path
- Removable Drives
You can simple add Namespace needed to allow access to or omit Namespaces to deny access to.
Example 1: This Configuration will allow access to Test123 folder inside C:\temp and Downloads Only
<rs5:FileExplorerNamespaceRestrictions>
    <rs5:AllowedNamespace Name="c:\temp\test123" />
    <rs5:AllowedNamespace Name="Documents" />
</rs5:FileExplorerNamespaceRestrictions>
Example 2: This Configuration will allow access to Desktop, Documents and Removable Devices attached Only
<rs5:FileExplorerNamespaceRestrictions>
    <rs5:AllowedNamespace Name="Desktop" />
    <rs5:AllowedNamespace Name="Documents" />
    <v3:AllowRemovableDrives />
</rs5:FileExplorerNamespaceRestrictions>
Restricted Namespace will show like

Start Layout
Start Layout is optional however it’s important to have better user experience. For Windows 10 you can control Tile Size, Row and Column for every icon.
Important Note: If the App is not installed, icon will not show in Start Menu.
TaskBar
TaskBar can be simply on/off. For Windows 10 you can customize the Taskbar Pinned Applications.
<Taskbar ShowTaskbar="true" />
<v5:TaskbarLayout><![CDATA[
  <?xml version="1.0" encoding="utf-8"?>
  <LayoutModificationTemplate
      xmlns="http://schemas.microsoft.com/Start/2014/LayoutModification"
      xmlns:defaultlayout="http://schemas.microsoft.com/Start/2014/FullDefaultLayout"
      xmlns:start="http://schemas.microsoft.com/Start/2014/StartLayout"
      xmlns:taskbar="http://schemas.microsoft.com/Start/2014/TaskbarLayout"
      Version="1">
  <CustomTaskbarLayoutCollection>
    <defaultlayout:TaskbarLayout>
    <taskbar:TaskbarPinList>
        <taskbar:DesktopApp DesktopApplicationID="Microsoft.Windows.Explorer" />
        <taskbar:DesktopApp DesktopApplicationID="windows.immersivecontrolpanel_cw5n1h2txyewy!microsoft.windows.immersivecontrolpanel" />
        <taskbar:DesktopApp DesktopApplicationLinkPath="%ALLUSERSPROFILE%\Microsoft\Windows\Start Menu\Programs\Microsoft Edge.lnk"/>
    </taskbar:TaskbarPinList>
    </defaultlayout:TaskbarLayout>
  </CustomTaskbarLayoutCollection>
  </LayoutModificationTemplate>
  ]]>
</v5:TaskbarLayout>
Auto-Logon Account
- AutoLogon Account is Optional
- When created in XML Profile, Local Standard Account will be created with no password and will automatically login to Windows after any start-up
- you can define account Display Name as below
  <Configs>
    <Config>
      <AutoLogonAccount rs5:DisplayName="KIOSK-IntuneB-TEST" />
      <DefaultProfile Id="{9A2A490F-10F6-4764-974A-43B19E722C23}" />
    </Config>
</Configs> - Configured account can be also:
- Active Directory or Entra Account
- Local or Entra or Active Directory Group
Experience
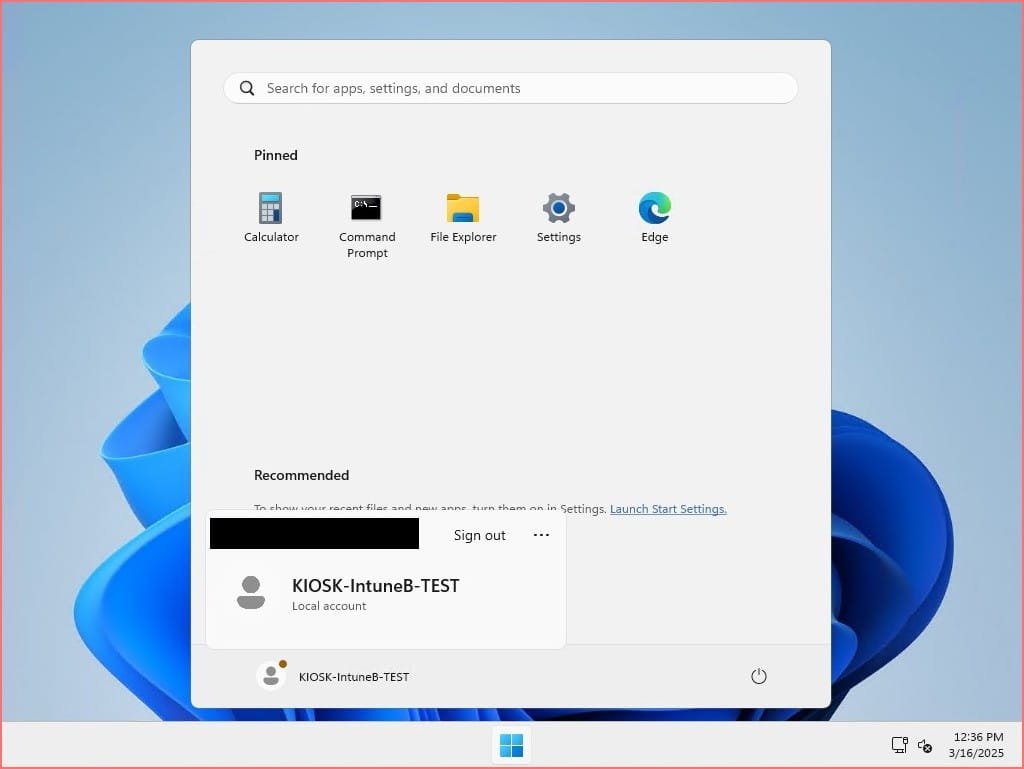
Windows 11 Multi-App Kiosk experience (Local Account) will show Start Layout like
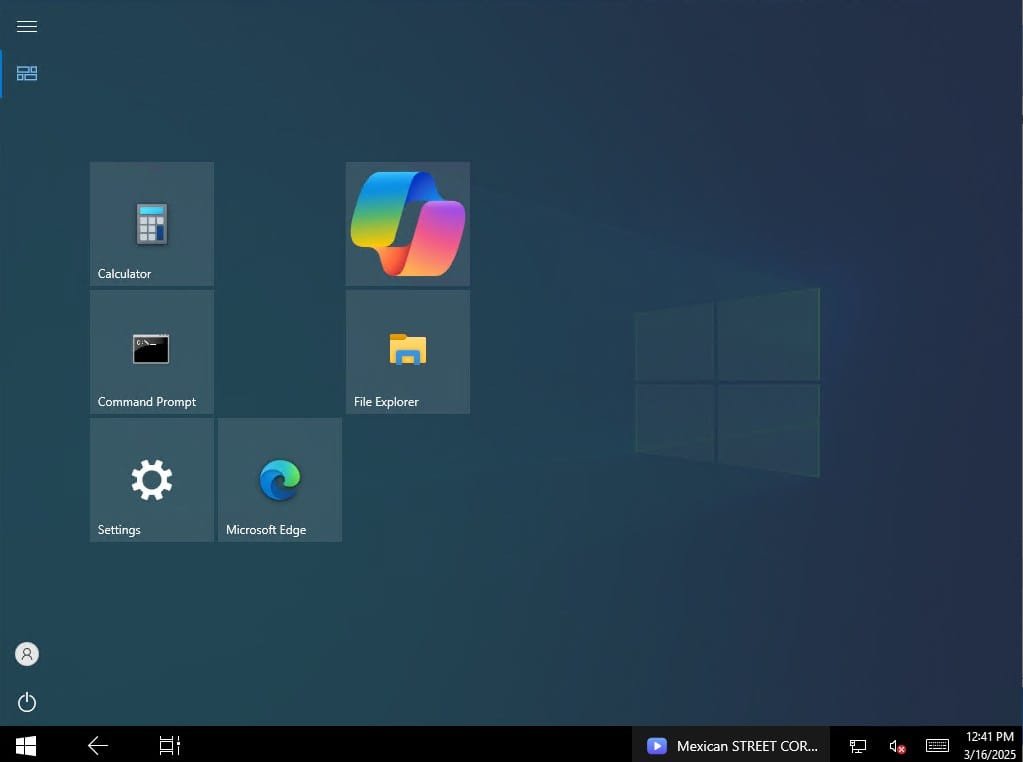
Windows 10 Multi-App Kiosk Experience with pinned Start Apps will show like
Conclusion
Microsoft Intune streamlines the administration of Windows Kiosk devices, enabling organizations to create secure, purpose-driven environments with ease. Through Assigned Access and Kiosk Mode, businesses can deploy single-app or multi-app kiosks, restrict unauthorized access, and ensure a consistent user experience.



Leave a Reply